raintemplates-t7

raintemplates-t5

raintemplates-t5

Theme images by MichaelJay. Powered by Blogger.

Featured Posts

Total Pageviews

Tips And No Tricks

Keys to a Happy Marriage

Lorem ipsum dolor sit amet, consectetur adipiscing elit


Recipes of Happiness

Duis placerat justo eu nunc interdum ultrices.


After You Got Married

Fusce ornare elit nisl, feugiat bibendum lorem.


Effective Methods for Families

Sed eget lacus sit amet risus elementum dictum.


Time with You Family

Etiam pharetra, tellus sit amet congue vulputate, nisi erat.

raintemplates-t3

raintemplates-t3

Find Us On Facebook

Share Us

Latest Posts

Featured Video

Video Of Day

raintemplates-t4

Social Media

raintemplates-t2

Header Ads

Ads

Popular Posts

Facebook Fanpage

Saturday, March 8, 2014

Hide full drive partition.

Hide full drive partition.
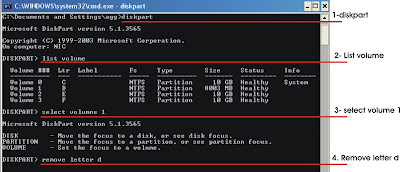
It is often seen that many people want to secure their data from other users or their friends. For this purpose they use different methods to hide their data but all these tricks are not reliable. BUT now I am telling you a secure method to hide full drive. You can put all your data in a drive and after applying this trick you will be able to hide full drive. To learn this trick, follow these steps.

  • First of all logged into administrative account.
  • Click on start, open run and type “CMD” and press enter.
  • Type “diskpart” and press enter.
  • After few seconds diskpart utility will appear.
  • Now type “list volume” to show list of volume and press enter.
  • Select the Drive or volume that you want to hide. If you have four drives C,D,E,F, and you want to hid “D” drive, then type “select volume 1”  and press enter.
  • Now in the next step type "remove letter D" to hide this drive.
  • Close CMD and open My computer to check…drive D is not there…
  • Now if you want to show the hidden drive then in step 7 type “assign drive d” and check “My computer”. Drive is back now.
  • Excellent trick, try it now.
Read More
    0

Friday, March 7, 2014

INCREASE SPEED OF HARD DISK

INCREASE SPEED OF HARD DISK


INCREASE SPEED OF HARD DISK
It is common observation that some times our computer slows down due to low performance of hard drive. This problem happens due to the slow performance or poor speed of hard drive. When we say about poor performance, actually we mean, poor speed of reading/writing of hard drive. This problem can be solved by increasing the hard drive speed. Follow these steps to solve your problem.


Click Start menu and select run.
Now type (sysedit.exe) in run and press enter.
System configuration editor will appear.
Here you can see some multiple windows but you will select (system.ini).
This window contains a line (386enh)
Now after this line type (irq14=4096)
Now close this window and save it.
Reboot your computer now.
You will surely feel better performance of your computer.
Enjoy.
Read More
    0

Monday, March 3, 2014

Replace Your Laptop Screen

Replace Your Laptop Screen


Broken notebook display? Popping in a new one is easier than you might think.

What's more distressing than the sound of your laptop's screen cracking as it hits the floor? The voice of a tech-support rep telling you it will cost close to $1,000 to replace it. With little more than a screwdriver, however, you can replace the screen yourself and save a bundle. Read on to see if a new LCD will fix your ailing laptop, and if so, how to find and install a new screen.


Step 1: Determine if you need a new screen

If you've dropped your laptop—or dropped something on it—and the screen has fractured, the diagnosis is easy. Connect an external monitor to your notebook via its VGA-out port to verify that the notebook's other components still work. If the laptop functions properly in all other respects, it's time to start hunting for the parts to fix the screen.

If your display problems aren't the result of visible physical damage, however, the problem may not be the LCD. If your screen's backlight flickers, shuts down after a few minutes of usage, or doesn't come on at all, but you can still see a faint screen image, your problem may be the inverter, a small board that supplies power to the backlight. The good news is that these boards are available for well under $100. (We'll show you how to locate and replace the inverter.) If replacing the inverter doesn't solve the problem, the backlight itself may be faulty. If that's the case, replacing the LCD should fix your problem.

If you see gibberish, lines, or a solid color on the screen, connect an external monitor and switch to that display (if you can). If the problem is evident on the external monitor, the issue is likely with your laptop's motherboard or video circuitry, not the display. If the external display works properly, the LCD or the cables leading to it are the likely problem.


Step 2: Find and remove the bezel screws
Carefully pry back the small rubber covers on the bezel to reveal the screws holding it in place.


Before buying a new LCD, you'll want to examine, and possibly remove, the current one. Doing so will give you a chance to spot other possible causes for your display problem, and to gather the necessary part numbers to ensure that you get the right replacement screen.

Before you begin, remove the laptop's battery and disconnect the power brick. For most laptops, you'll need only a couple of tools to remove the screen: a small Philips screwdriver, and a very small flat-head screwdriver or a knife.

First, you'll need to locate the screw covers. These small rubber covers are generally found on the front of the display's bezel (surrounding frame), though on some notebooks you might find some of the covers along the side of the screen. (Note that these instructions will work for most laptop models, but occasionally you'll encounter unusual designs such as Apple's iBook G4, which uses Allen screws, or Apple's MacBook, which has no screws holding its bezel in place.)

Use the tip of a small flat-head screwdriver or knife to carefully pry back the corner of each rubber cover around the screen until you can see if a screw lies underneath. If you locate a screw, remove the cover and place it in a small plastic bag or other safe location. Typically, you'll find at least four, and perhaps six, screws on the bezel. After you've located them all, remove them and store them with the covers.


Step 3: Remove the bezel
Once you've removed all of the bezel's securing screws, gently pull the bezel away from the LCD.


At the bottom center of the LCD screen, carefully work your fingers between the bezel and the screen, and gently pull the bezel. Usually, it will easily snap loose; if not, gently pull it in different directions until it does. Carefully work your way around the rest of the bezel, pulling it away from the rear plastic of the screen cover.

Once the bezel is off, you'll see the LCD in its metal frame. On most notebooks, the inverter board is directly below the screen. You may now be able to tilt the LCD forward, away from the plastic shell behind it. If not, check for additional screws securing the frame to the shell.

If you're troubleshooting a problem that doesn't involve physical damage such as a cracked screen, check the cable connecting the screen to the motherboard and inverter for loose connections or broken wires. If you're lucky, the solution to your problem may be as simple as reseating a loose cable or replacing an obviously broken one.

Tip: If at any point the bezel doesn't pop free with a moderate amount of force, check to make sure you didn't overlook any screws.


Step 4: Find the right replacement parts
Exposing the rear of the LCD panel lets you see its manufacturer part-number info, as well as reach its cable connections.


Now that you've exposed the screen, look for a label on the back showing the manufacturer's part number. This typically consists of one or more letters, followed by a series of numbers. Manufacturers sometimes use different screens for variants of the same laptop model, so having this number will ensure that you get the proper replacement screen for your laptop.

Armed with this information, you're ready to secure a replacement screen. Chances are you can purchase the screen from your notebook's manufacturer, but you'll probably pay a steep premium. Your best bet is to search elsewhere online. Enter the part number for the LCD (or the laptop's model number and terms like "replacement LCD") in a search engine to find a variety of online resellers for laptop parts. eBay is another good source—you'll find new screens, functioning used screens pulled from broken notebooks, and replacement inverters.

A company specializing in replacement LCDs for most major laptop brands, ScreenTek is another great place to start. It also offers improved high-gloss screens for some laptop models, as well as an assortment of illustrated installation guides.


Step 5: Replace the broken screen
After you position the new LCD, screw it into place in the metal frame.


Before removing the broken LCD, you'll need to disconnect the cables connecting it to your notebook. The video cable is typically a long ribbon cable taped to the back of the screen. Remove the tape, then carefully unplug the connector from the back of the LCD. Also be sure to disconnect the power cable between the LCD and inverter. If you need to remove the inverter to replace it or to access its power connector, simply remove the screws holding the inverter in place, then unplug the power connectors from each side of the inverter board. Once the cables are disconnected, remove the screws holding the LCD to the metal frame, and slip the old LCD out. Installing the new LCD is simply a matter of reversing the process: Screw the new LCD into the metal frame, then connect the video cable and inverter.


Step 6: Power it up

Before replacing the bezel and its screws, put the new screen to the test. Attach your power brick or reinstall the battery, and power up the laptop. If the screen doesn't work properly, power down, then double-check the inverter and video-cable connections.

Once you're sure everything's working, snap the bezel in place, replace the screws, and press on the screw covers. (You might want to add a dab of mild glue, such as Elmer's, to the back of the screw covers to secure them.) Your laptop is now back in action, at a fraction of the cost you'd pay to have the screen replaced by the manufacturer.
Read More
    0

Sunday, March 2, 2014

Core i7-4770K Review

Intel Haswell Makes Its Debut: Core i7-4770K Review


Regular TechSpot readers will have no doubt spotted several mentions of Haswell on our front page this year. In the past few months we have covered everything from model names to performance and battery life claims. A key focus has been Haswell's graphics, with rumors suggesting its performance is set to be 2 to 3 times that of current HD 4000 integrated graphics.
So what is Haswell exactly? It is Intel’s 4th generation Core architecture which will see a major refresh of the entire Core i3, Core i5 and Core i7 product lineup in 2013. Whereas last year’s Ivy Bridge was a "tick" release, Haswell is a tock and traditionally that's meant a more significant advance forward.
Efficiency and graphics have remained key areas of focus for Intel in the last couple of generations and Haswell is no different. Intel did claim that Ivy Bridge was a "tick+" due to the more significant overhaul to the graphics side of things. Even so, despite providing up to twice as much graphics performance as Sandy Bridge under certain scenarios, it was still very underwhelming 3D rendering power when compared to discrete solutions.

And the time has finally come. Haswell is ready to be unveiled, along with Intel’s latest on-die GPU solutions. Today we'll only be checking out the new HD 4600 Graphics which comes as part of the high-end Core i7-4770K desktop processor. Faster HD 5000 Graphics and Iris Graphics 5100 and 5200 solutions will also become available starting today. As expected, the most powerful integrated graphics solutions are being reserved for processors designed for mobile devices, such as Ultrabooks.

4th Gen Intel Core CPU Family

The Haswell lineup is comprised of several desktop and mobile Core i7 and Core i5 processors that will effectively replace most of the current offerings under those series. Core i3 variants will make it to market later in the year.
The new Core i7 desktop processors include the Core i7-4770K, i7-4770R, i7-4770T, i7-4770S, i7-4770 and i7-4765T -- all selling for $303 except for the i7-4770K that sells for a slight premium at $339. The Core i7-4770K and i7-4770 are identical in almost every way with a few exceptions. The K version comes with an unlocked multiplier and is 100MHz faster out of the box. The Intel vPro/TXT/VT-d/SIPP technologies have also been removed from the K series.

The Core i7-4770S and i7-4770T are members of the low power series and as such the TDP has been reduced from 84w down to 65w and 45w, respectively. A determining factor in achieving this lower consumption is a lower CPU base frequency, reduced from 3.50GHz to just 3.10GHz for the i7-4770S and 2.50GHz for the i7-4770T.
All Haswell Core i7 desktop processors feature 4 cores with 8 concurrent threads when using Hyper-Threading. The Core i7-4770K operates at 3.50GHz with a Turbo Boost frequency of 3.90GHz, while the non-K version features the same Turbo Boost frequency with a base clock of 3.4GHz. They are designed to work with DDR3-1333/1600 memory and feature an 8MB L3 cache.
The most interesting of the Core i7 range is the 4770R, which operates at 3.20GHz with a Turbo frequency of 3.90GHz and uses the BGA package. This model dumps the HD 4600 Graphics used by all other desktop Core i7 processors and instead opts for the more powerful Iris Pro Graphics 5200. The only downside to this chip is the L3 cache reduction from 8MB to 6MB.
Intel is also offering a lower clocked model, the Core i7-4765T which has a TDP of just 35 watts and comes clocked at just 2.0GHz with a 3.0GHz maximum Turbo frequency.

Then there is the new Core i5 series which features the i5-4670K, i5-4670 and i5-4570 processors priced at $242, $213 and $192, respectively. There are also the Core i5-4670T, i5-4670S, i5-4570S, i5-4570T and Core i5-3450S low power models. We know, it gets very confusing, so let’s talk about the standard processors first.
All standard Haswell Core i5 processors carry an 84W TDP and feature four cores and four concurrent threads. The only Core i5 processor to differ from this configuration is the i5-4570T which features two cores with Hyper-Threading for four threads.
The Core i5 range is clocked aggressively: the i5-4670K and i5-4670 operate at 3.40GHz with a Turbo Boost frequency of 3.80GHz. Meanwhile the i5-4570 is clocked at 3.20GHz with a Turbo frequency of 3.6GHz.
All Core i5 processors feature a 6MB L3 cache, with the exception of the i5-4570T, which has been downgraded to 3MB. All desktop Core i5 processors use the HD Graphics 4600 engine without exception.

The low-power Core i5 range is equally confusing. The four models available at launch are different, though many of them occupy the same price range. The Core i5-4570T is essentially a Core i3 processor with Turbo Boost added. This processor operates at 2.90GHz with a Turbo Boost speed of 3.60GHz. However like the Core i3 processors, the i5-4570T features only two cores with Hyper-Threading support and a smaller 3MB L3 cache, it is said to cost $192.
Then there is the Core i5-4670T and i5-4670S (both $213). The i5-4670T features a thermal design rating of 45w and works at 2.30GHz with a Turbo Boost frequency of 3.30GHz. The i5-4670S is actually faster, working at a base clock of 3.1GHz with a Turbo Boost frequency of 3.8GHz. As you would expect the i5-4670S has a higher TDP rating of 65w.
Finally, we have the Core i5-4570S and i5-4570T processors (both $192) which feature a TDP rating of 65w and 35w, respectively. Both CPUs have a base clock of 2.90GHz with a Turbo Boost frequency of 3.60GHz.
Read More
    0

Toshiba Encore Windows 8 Tablet Review

Toshiba Encore Windows 8 Tablet Review

Toshiba Encore Windows 8 Tablet Review
Find and Compare the Best Tablets


Eight inch tablets are hot items right now as consumers are discovering the perfect balance they often present between portability and usability. Apple’s iPad mini is an especially popular choice among people looking for a well-polished device with a fantastic selection of apps, but there are plenty of other competitors to choose from.
Toshiba Encore - $280 - $350
  • 8.0”, 1280x720 HFFS LCD (189 ppi)
  • Intel Bay Trail Z3740 SoC
  • 1.3 GHz quad-core CPU, HD Graphics GPU, 2GB RAM
  • 32 or 64 GB internal storage, microSD card slot
  • 8 MP camera, 1/3.2” sensor, f/2.2 lens
  • Wi-Fi a/b/g/n, Bluetooth 4.0, 19.5 Wh battery
  • Windows 8.1 + Microsoft Office
  • 445 grams, 10.7mm thick
When it comes to 8-inch Windows tablets, the release of Windows 8.1 has seen many companies try their hands at crafting the perfect tablet. Acer was first with the mediocre Iconia W3 and shortly afterwards a ton of other devices came to the market from the likes of Dell, Asus, Lenovo and also Toshiba, whose 'Encore' tablet is the focus of today’s review.
Like a lot of small Windows tablets in the same price bracket as the Encore, specifications aren’t stellar especially in the display department: we’re looking at a 1280 x 800 panel, a resolution which Windows device manufacturers seem to love. There’s also the popular Intel Atom Z3740 SoC inside, as well as an 8-megapixel camera and 19.5 Wh battery, which makes its hardware package overall a little different to the Lenovo Miix 2 8, which we're also in the process of reviewing.

Design

Most eight inch tablets feature some form of the standard, slightly-rounded rectangular prism design. The Toshiba Encore is no exception, although its take on the slate design is rather uninspiring.

The Encore is a fairly chubby device, making no attempt to match the svelte nature of some of its competitors. Its 10.7mm thick and 445 grams heavy profile compares unfavorably to the Lenovo Miix 2 8 (at 350g and 8.35mm thick) and to the highly popular Apple iPad mini Retina (308g/7.5mm). The size doesn't just look bad on paper, the Encore feels portly in your hands and the design doesn’t try to hide it.
Compounding the issue is the sizable bezel around the display. To either side of the panel is 14mm of plastic and glass, which makes the tablet feel just slightly wider than what would normally be comfortable. Display coverage is just under 65%, although the device is still quite portable overall, significantly more so than a 10-inch device.


Apart from the glass protecting the display, the rest of the Encore is made from plastic that wraps right around the tablet, providing a rim around the front panel. The plastic in no way gives the tablet a premium feel, despite the square pattern that’s used on the back (also only available in silver).
Like most other eight inchers, everything is positioned so that portrait is the default orientation. Most aspects of the design are extremely minimalist: the front has a small piece of branding plus a Windows button and front facing camera to the far right; whereas the back features a Toshiba logo along the bottom, an Intel Inside sticker that looks somewhat out of place, and a rear facing camera in the top left.


On the bottom edge you’ll find the tablet’s dual speakers. In our tests these didn't perform well at high volumes but are certainly usable for casual listening. The right edge has the fairly weak-feeling power button and volume rocker, and the left side has an exposed microSD card slot. All the ports for the device are along the top edge, such as the 3.5mm audio jack, microUSB port and micro-HDMI port, the latter of which some may find especially useful if they want to frequently use external displays.

The design of the Toshiba Encore doesn’t stop you from enjoying the hardware in the device, but it definitely lacks a spark that would make it a more attractive offering. With an 8-inch display the tablet is portable, however it’s neither as slim nor as light as some of its competitors.

Display

Toshiba has gone for an 8.0-inch TFT HFFS LED-backlit LCD panel in the Encore, with a resolution of 1280 x 800. HFFS, which stands for high-transmittance fringe field switching, is an alternate display technology to IPS that offers less color shifting and similar viewing angles. It’s not a display type we often see, but Toshiba might have chosen it to keep manufacturing costs down.
I’m not particularly happy with the resolution of this 8-inch display when other sub-$300 tablets manage to include 1080p panels. Individual pixels are reasonably noticeable (189 PPI) especially along the edges of text, but also when looking at photos and videos.

The panel is capable of displaying 720p videos natively, while all 1080p content will be downscaled to 720p.
This is not to say the Encore’s panel is completely unusable. WXGA is fine for everyday tasks, as has been the case for many years, but over the past 12 months it has been quickly superseded by lower-cost high-density displays. When Asus can produce a 7-inch tablet with a 1080p display for a little over $200, and Amazon can do the same at 8.9-inches, the Toshiba Encore seems behind the times.

Aside from screen resolution the overall color quality is average, especially in terms of saturation, which is noticeably lacking compared to IPS LCDs. The panel’s contrast is good, although there is backlight bleed when viewing dark images, and a minor amount of color banding when viewing gradients.
One area the Encore’s display really excels is viewing angles. Like an IPS panel, the Encore’s LCD is viewable at nearly all angles, however there is noticeably less color shifting and distortion. This is actually surprising considering there is a decent gap between the protective glass and panel itself, which in TN panels would significantly affect viewing angles.


The gap does manage to affect the panel’s reflectivity, which can make the display a little tricky to view in bright settings. Maximum brightness from the LED backlighting is very good, which negates some of the reflectivity issues, and there’s a wide range of brightness levels to make use of. The well-hidden photodetector provides accurate automatic brightness, although it can be somewhat slow to adjust.


Performance: Intel Bay Trail Atom Z3740

Inside the Toshiba Encore is Intel’s ‘Bay Trail’ Atom Z3740 SoC, a very popular choice among manufacturers building mid-range and entry-level Windows tablets. The very same SoC is seen in the Asus Transformer Book T100 and Lenovo Miix 2 8, so the performance from the Encore should largely be the same as these devices.
CPU-wise we’re looking at four 1.33 GHz ‘Silvermont’ cores, with a Turbo Boost of 1.86 GHz when higher single-thread performance is needed. There’s an Intel Gen 7 HD Graphics GPU clocked at 667 MHz, plus a dual-channel LPDDR3 controller that’s paired with 2 GB of 1067 MHz RAM. Bluetooth 4.0 and dual-band Wi-Fi 802.11a/b/g/n make up the tablet’s connectivity; there’s no LTE/HSPA+ model available, which some users will find disappointing.

General performance around the operating system is very good. All animations are fluid thanks to hardware acceleration, and loading Modern apps is reasonably fast. The included 2 GB of RAM is standard in tablets now, and as you’d expect it allows the device to multitask with little effort. Using the browser is also quick when manipulating and loading webpages, not as quick as a high-end Intel ‘Haswell’ processor, but on-par with ARM-based devices.
Windows 8.1 will give you access to the full desktop on the Toshiba Encore, and you’ll easily be able to use non-intensive applications such as Microsoft Office, VLC, Spotify and the included Windows Explorer. However the Atom SoC is definitely unsuitable for more professional tasks, such as using Photoshop or rendering in 3ds Max.

There are a few performance hiccups along the way. From time to time the power button would become completely unresponsive, making it impossible to wake up the device, and at other times the Windows button wouldn’t work. There were also a few occasions where an application I was using crashed, or simply refused to load at all. Hopefully we’ll see these minor annoyances fixed through a software update.
The Encore won’t struggle with games available through the Windows Store, as Intel’s seventh-generation HD Graphics GPU – a low-power version of the GPU found in their ‘Ivy Bridge’ processors – is always up to the task. The GPU only needs to render to a 1280 x 800 display, so you might find that some older Steam games will also work on the Toshiba Encore, provided you connect a keyboard and mouse.
When it comes to benchmarks, the Encore performs as expected. The Bay Trail SoC is a strong performer in CPU-bound tasks, both single-threaded and multi-threaded, despite what may seem to be low clock speeds. I’d have liked to see the Z3770 here to squeeze out a bit more performance, but the Z3740 is still a good choice.
Intel isn’t known for their fantastic graphics cores, but the HD Graphics unit in this SoC is a decent performer. It’s not at the same level as the Adreno 330 in Qualcomm’s Snapdragon 800, or the PowerVR G6430 in the Apple A7, but at lower resolutions like you’ll see on the Encore, it doesn’t disappoint.
The Encore is available in two models, 32 GB and 64 GB, both of which come with a microSD card slot for expanding storage. Our 64 GB review unit is formatted with 52.7 GB of space, of which around 40 GB is user accessible out of the box. This is more than enough to store a range of apps plus some local media, and a better choice compared to the 32 GB, which will be restricted as Windows 8.1 requires a lot of space.
There doesn't appear to be any issues with the Bluetooth or Wi-Fi performance of the Toshiba Encore. I easily managed to transfer data on both my 2.4 GHz and 5 GHz 802.11n networks at over 18 MB/s. Admittedly it doesn’t have the latest Wi-Fi technology (802.11ac), but routers packing this tech are yet to become widespread.
Read More
    0

Check If Someone Is Using Your Wi-Fi

Check If Someone Is Using Your Wi-Fi

Check If Someone Is Using Your Wi-Fi


There are many reasons why you'd want to check if an unauthorized party is using your wireless network. It may be that you're experiencing a slower than normal Internet connection or you simply don't want anyone getting a free ride while you pay the bill. Of course, there are also security implications if this person can somehow access files on your network, and even legal implications if he uses your connection for piracy or other illicit activities.
Whatever the case it's better to stay on the safe side. Many of you may have already taken some basic precautions when setting up your wireless network and know your way around troubleshooting these issues. This brief guide is aimed mostly at novice users in need a hand to find out if, indeed, their Wi-Fi is being stolen.

Check the devices associated with your router The first thing you need to do is login to your router's administrative console by typing its IP address directly into the browser address bar -- typically 192.168.0.1 or 192.168.1.1 depending on which router you have. If you don't know your router's default address check out this guide or simply go to the command prompt (Start > Run/Search for cmd) and enter ipconfig. The address you need should be next to Default Gateway under your Local Area Connection.
Alternatively, if you are on a Mac, you can find the default address by going to Network under System Preferences. It should be listed right next to "Router:" if you are using Ethernet, or by clicking on "Advanced…" and heading to the "TCP/IP" tab if you are using Wi-Fi. Next, point your browser to that address and enter your login details -- if you haven't changed the default settings it should be a combination of "admin" and "password" or blank fields. Here's a default username and password list (PDF) you might find useful, but we recommend you change this afterwards.
Once inside your router's administrative console look for a section related to connected devices or wireless status. In my old DIR-655 from D-Link it's available under Status > Wireless but you'll find it as "Attached Devices" in Netgear routers, under DHCP Clients Table on Linksys routers, "Device List" if you are using the Tomato firmware, and so on.

DHCP client list examples on D-Link and Linksys routers.
This should provide a table with the IP, MAC address and other details of every device currently connected to the router. Check that list against your gear to find any intruders. You can find out the MAC/IP address of your computers by going to the Command Prompt again and entering 'ipconfig /all'. The MAC address will be shown as the physical address. I'll let you figure it out for mobile devices like smartphones and media players since I can't possibly list all options.

Taking action The best and simplest solution is to set up a strong password using WPA2 or WPA -- WEP is very easy to crack so avoid that if possible. There are some other methods you can use to beef up security, like switching off the SSID broadcast (which prevents it from advertising the name of your network to nearby Wi-Fi devices) or setup a filter for allowed or blocked devices by MAC address. It won't stop the most determined intruder but it will slow him down.
That should be more than enough for most users but if you need to actually track down who's been breaking into your network it's possible to pinpoint his physical location using a tool called MoocherHunter. You'll need to burn a Live CD to boot your laptop with and walk around to track down unauthorized wireless clients. According to the program's description, it detects traffic sent across the network and can find the source within 2 meters accuracy.
Needless to say, we're not suggesting you take matters into your own hands, but it might come in handy if someone is getting you in trouble with authorities using your network for illegal purposes -- or simply to have a cool story to tell.
Read More
    0

Key Board


Read More
    0

Services

More Services

© 2014 Gonewtec. Designed by Bloggertheme9
Powered by Blogger.